
Each year, as I write down my list of resolutions for the upcoming months, I section off a portion of the items to tackle in a “Food” category. They typically range from specific projects, to broad scope themes such a portion control, to monthly challenges and a general overall reminder to not be afraid to try new things. As days pass, I return to this list and make notes of tasks I’ve accomplished, or at least those I’ve worked on – the later is something I highly recommend. It can be a bit dispiriting to look back at the list at the end of the year and see nothing completed, but if there’s a note that says “hey, I tried” it’s not nearly as depressing. At least that’s what I tell myself every time I see the “let’s get in shape this year” bullet point.
One of the food challenges that has been on my New Year’s Food Resolutions list for longer than I care to admit (okay, fine, since you asked, I think we’re on the third year) has been a baked good with its own recognizable shape – Croissants.
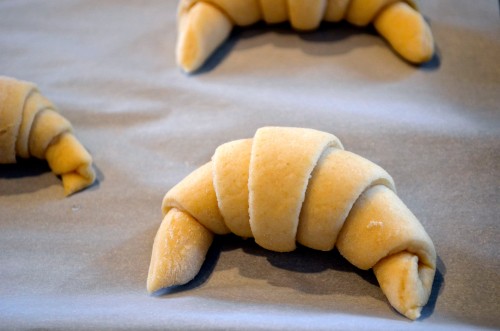
After watching the much beloved Julia Child work her magic on The French Chef via Twitch with her croissant recipe, I realized the process may not be as challenging as I had built it up in my mind to be. With an arsenal of cookbooks in my kitchen, I decided upon using Sarabeth Levine’s recipe as my guide. Croissants are a bit time consuming, but what I found the most challenging during the entire process was making sure I had my timing down in terms of what day I would make the dough for what day I wanted to bake the goodies off. Ultimately, timing was on my side, and these were the perfect Easter morning delicacy! Given that this was my first time trying my hand at croissants, I may adjust my baking time on my next go-round — the finished product was a bit too browned for my liking, although that might also be due to their rather diminutive size. Still, another checked item off the ol’ resolutions list and another success from Levine!

Croissants
Adapted from Sarabeth Levine’s Sarabeth’s Bakery: From My Hands to Yours
Croissant Dough
Makes 2 batches of croissants
Détrempe
2 ¼ teaspoons dry active yeast
¼ cup granulated sugar
1 ¼ cups whole milk
1 ¾ cups bread flour, plus more for rolling out the dough
1 ¼ cups whole wheat pastry flour, sifted
1 teaspoon fine sea salt
Beurrage
½ pound (2 sticks) unsalted butter, chilled and cut into tablespoons
2 tablespoons bread flour
*Make the dough at least two days before using
- To make the détrempe, sprinkle the yeast over ¼ cup warm milk (105° to 115°F) in a small bowl. Let stand until the yeast softens and begins to bloom, about five minutes. Whisk well to dissolve. Pour into the mixer bowl of a stand mixer, then add the sugar. Add the remaining 1 cup cold milk.
- Mix the bread and pastry flours together. Add 2 cups of the flour mixture and the salt to the bowl of the stand mixer with the yeast and milk mixture. Attach the bowl to the mixer and fit with the paddle attachment. Mix on low speed, adding enough of the remaining flour mixture to make a soft, sticky dough. Do not overmix. Transfer the dough to a floured work surface, knead a few times to smooth the surface, and shape into a ball.
- Dust a half-sheet pan with flour. Place the dough on the pan and cut an X about 1-inch deep in the top of the ball to mark it into quadrants. Sprinkle with flour on top and refrigerate.
- Immediately make the Beurrage. In a clean mixer bowl with clean paddle attachment, add the butter and beat on medium speed until the butter is almost smooth, about 30 seconds. Add the flour and continue beating until the mixture is smooth, cool, and malleable, about 30 seconds more. Transfer the butter to a lightly floured surface and press any remaining lumps out with the heel of your hand, and shape the butter into a 4-inch square. Place the beurrage on the half-sheet pan next to the détrempe and refrigerate all together for about 15 minutes.
- Flour the work surface again. Place the dough on the work surface with the end of the X at approximately 2, 4, 7, and 10 o’clock positions. [For a visual on the dough making process, I highly recommend looking into Sarabeth’s cookbook, as she has fantastic step-by-step photos and I neglected to take any.] You will notice four quadrants of dough between the crosses of the X at the north, south, east, and west positions. Dust the top of the dough with flour. Using the heel of your hand, flatten and stretch each quadrant out about 2 ½ inches to make a cloverleaf shape with an area in the center that is thicker than the “leaves”. Use a tapered rolling pin to roll each “cloverleaf” into a flap about 6-inches long and 5-inches wide, leaving a raised square in the center. Using the side of the rolling pin, press the sides of the raised area to demark the square.
- Place the butter in the center, on top of the dough square. Gently stretch and pull the north-facing flap of dough down to cover the top and sides of the butter square, brushing away excess flour. Now stretch and pull the south-facing flap of dough up to cover the top and sides of the butter square. Turn the dough so that the open ends now face north and south. Repeat folding and stretching the now north- and south-facing flaps of dough to completely cover the butter, making a butter-filled packet of dough about 6-inches square.
- Dust the work surface with flour. Turn the dough so the four folded over flaps face down, with the open seam facing you. Dust the top of the dough with flour. Using a large, heavy rolling pin held at a slight angle, lightly pound the top of the dough to widen it slightly and help distribute the butter inside the dough. Roll the dough into a 17-by-9-inch rectangle. Fold the dough into thirds, like you would fold a letter, brushing away excess flour. This is called a single turn. Roll the rectangle lightly to barely compress the layers. Transfer to a half-sheet pan and refrigerate for 20 minutes.
- Lightly flour the work surface again. Place the dough on the work surface with the long open seam of dough facing you. Dust the dough with flour. Roll the dough out into a 17-by-9-inch rectangle. Fold the right side of the dough 2 inches to the left. Fold the left side of the dough over to meet the right side. Fold the dough in half vertically from left to right. This is a double turn, also known as a book turn. Roll the rectangle lightly to barely compress the layers. Transfer to a half-sheet pan and refrigerate for 20 minutes.
- Repeat rolling and folding the dough into a final single turn (see step 7 for a reminder). With the long seam facing you, cut the dough in half vertically. Wrap each piece of dough tightly in plastic wrap, then wrap again. Freeze for at least 24 hours or up to 4 days.
- The night before using the dough, transfer the frozen dough to the refrigerator and let thaw overnight, about 8 hours. Once defrosted it will begin to rise, so make sure to roll it out immediately.

Croissants
Unbleached all-purpose flour, for rolling the dough
½ recipe Croissant Dough, thawed overnight or for 8 hours in the refrigerator
1 large egg, well beaten
You will also need: two large kitchen bags, two tall glasses, and very hot water
- Line two half-sheet pans with parchment paper. Dust the work surface well with flour. Place the dough on the work surface with the open seam of the dough facing you. Dust the top of the dough with flour. Using a large, heaving rolling pin, roll out the dough into a 16-by-12-inch rectangle. Don’t press the dough too hard; let the weight of the rolling pin do much of the work. If you change the position of the dough while rolling, it is important to keep track of which side contains the seam.
- Turn the dough with the seam facing you. (If you’ve lost track, look carefully as the sides of the dough – you should be able to discern it, even though it is faint.) Using a pizza wheel and a yardstick, neatly trim the rough edges. Cut the dough in half lengthwise to make two 16-by-6-inch rectangles. Fold each rectangle into thirds, place on a half-sheet pan, and refrigerate uncovered for 15 minutes.
- Remove one piece of dough from the refrigerator. On the lightly floured work surface, unfold the dough strip and gently roll, allowing the weight of the rolling pin to smooth the creases created by folding the dough. Using a pizza wheel, starting at the top left corner of the strip, cut down to make a half-triangle with a 2-inch base; set aside. Measure 3 ½-inches from the top left corner of the strip and make a notch with the wheel at this point. Cut down diagonally from the notch to meet the bottom left edge of the dough strip to make another triangle with a 3 ½-inch base. Continue cutting, alternating diagonal cuts, to cut out 6 triangles. The last cut will also yield a half-triangle with a 2-inch wide base.
- Place a triangle with a 3 ½-inch base on the work surface with the base of the triangle facing you. Stretch the bottom slightly so it is about 5-inches wide. Pick up the triangle. With one hand, hold the dough triangle at the bottom and stretch it with your other hand until it is about 7-inches long. Return the triangle to the work surface. Starting at the bottom, roll up the triangle, and finish with the tip underneath the croissant. Place on one of the prepared half-sheet pans. Curve the croissant by bringing the two ends closer to each other, crossing the two ends over each other and pressing together if needed. Repeat rolling the remaining dough triangles, placing them on the half-sheet pan with decent space between them. Overlap the two 2-inch base half-triangles at their long sides and press the seam together. Roll up as described for the large triangle and add to the half-sheet pan. Alternatively , gently stretch the 2-inch base half-triangles into modified triangles, with a large base and small tip, and roll as described for smaller, slightly odd croissants.
- Repeat cutting and rolling croissants with the second half of the dough. Once all croissants have been cut, shaped, and set on the two half-sheet pans, choose a warm place in the kitchen for proofing. Slip each pan into a tall “kitchen-sized” plastic bag. Place a tall glass of very hot water near the center of each pan. Wave the opening of each bag to trap air and inflate it like a balloon to create “head room,” being sure that the plastic does not touch the delicate dough. Twist each bag closed. Let stand until the croissants look puffy but not doubled, 1 ½ to 2 hours.
- Meanwhile, position the racks in the center and top third of the oven and preheat to 375°F. Remove the glasses from the bags, then the pans. Lightly brush the croissants with the beaten egg. Bake for 10 minutes, rotating the pans halfway. Reduce the heat to 350°F and continue baking until the croissants are crisp and golden brown, about 10-15 minutes longer, rotating the pans halfway through. Serve warm or cool to room temperature, if you’re able to resist the flaky goodness.


